Toasting with Cake
 I'm running seriously behind on blog posts, and the pictures from my latest experiments are piling up. So expect a greater than usual density of new posts in the next couple of months. . . One of the posts that's been waiting a while is the post in honor of my husband's birthday (cake.) I have to say, he was so excited about the way it turned out, that he jumped the gun and posted all the pictures on Facebook before I even had a chance to think about the blog post. Followed by other people re-posting the pictures, one of whom was my brother, who referenced the (nonexistent at the time) blog post. . . So I apologize if you've tried to access this post before it was written. But here it is, finally. .
I always try to theme my husband's birthdays -- usually with a class that we take, together. So far, we've learned to make sushi, did a little glass-blowing, brewed some beer, etc, etc. This time, the big celebration was alcohol-themed (a no-brainer for the celebratory thing, right?) And, in keeping with the theme, I decided to do a wine inspired cake. I have to say that this cake succeeded beyond my wildest dreams. It definitely turned out better than my husband expected -- the only clue I gave him as to the finished cake were the colors that would be used. When he heard brown, black, ivory, and a touch of red, he was dubious at best as to the quality of the final result. However, to both of our delight, it turned out almost exactly the way I imagined it, thanks in no small part to this YouTube video from Haniela. The video was so easy to follow, and if you prefer to watch rather than read your tutorials, you should definitely follow her. I'll try to break it down in the pictures below -- it wasn't half as hard as you would think, but this cake was definitely time consuming. For the sake of everyone's sanity (including my own,) I'll focus on the decorations instead of including the entire process of baking, as well.

As you can see, my cake was a little uneven. It didn't rise evenly in the oven, so despite all of my patchwork, it still was lower on one side than another. However, this particular cake design is so fool-proof that it didn't even really matter.

So, if you couldn't guess, this is going to be a wine crate. To make it look like a real wooden box, I cut ivory colored gumpaste into four rectangles to fit each side of the cake (but really, a little larger, so that the top of the box is higher than the top of the cake. To allow for each rectangle to fit along the edge of the other rectangles, the gumpaste was rolled out an additional 0.5 in for each piece (so two pieces which are 4.5 in in length and 2 pieces which are 11.5 inches in length. Since the height of the crate has to accommodate the bottle that will be in it, the height of each panel was 5.5 in in height.

Now, as you can see, the colored gumpaste looks a little more like wood than a bright white strip would, but it's still not very convincing. To get that wooden texture, I placed a wood imprint strip over the gumpaste and, using some major pressure (triceps workout!) rolled the print onto the gumpaste. I repeated this over and over along all the panels of gumpaste until they really looked like strips of wood.
Well. . . they looked like strips of wood if you ignore that pale yellow-ey tan color (kind of gross looking, in actuality. . .) But never fear, this is only the base color. How do I get that rich textured look of an aged wood? By using my brand new airbrush kit! (Which, incidentally, I received for my birthday.) So airbrushing looks really hard, and if you're trying to get a nice even sheen of color, it can be difficult, but to get that aged look, the color really should be a little patchy to look realistic. So spray some brown color onto the panels, let the color pool in certain places more than others, and easy-peasy, you have wooden panels. Now, don't forget, these are still essentially strips of sugar paste, so they're really flexible and thus will tear very easily. I left them to dry flat on parchment for several days until they were stiff enough to really resemble wood.

Before we get into the actual structure of the wine bottle, I'm going to skip to the best and most interesting part -- the label. I used Microsoft Word to design the label. I swear, that program can do everything. I've designed everything from furniture to bottle labels using it -- word processing is the least of it's abilities. And I had so much fun doing the label! I really did my research and looked up what should go on an actual label -- vineyard, vintage, etc., but made sure I incorporated things like my husband's birth year, his birthplace and his favorite type of wine as a couple of the elements.
Now, you can totally print a label on regular paper and glue it onto the bottle. But I really wanted everything to be edible, so a frosting sheet seemed like the best solution. What is a frosting sheet? Well, a frosting sheet is exactly that -- a sheet that resembles a piece of paper but is actually made of sugar. It retains the feel and flexibility of paper, but it's edible! And you can print on it (using edible ink, of course.)
So up to the ink part, I was fully prepared to do this entirely on my own, but then I realized that I would have to unburden my printer of the ink already in it, fully clean it, and load it with edible ink of my own. . . which was enough work to give me a headache just thinking about it. So, solution? Etsy, of course. After designing the label, I sent it off electronically to TLCEdibles and lo-and-behold, a week later, I had a fully edible wine label sitting in my hands.
For the structure of the wine bottle, gumpaste again -- black this time.
The trick to making this decoration is to snag a real wine bottle to use as the mold (and this can be done with any type of bottle cake -- milk, beer, whisky, etc.)

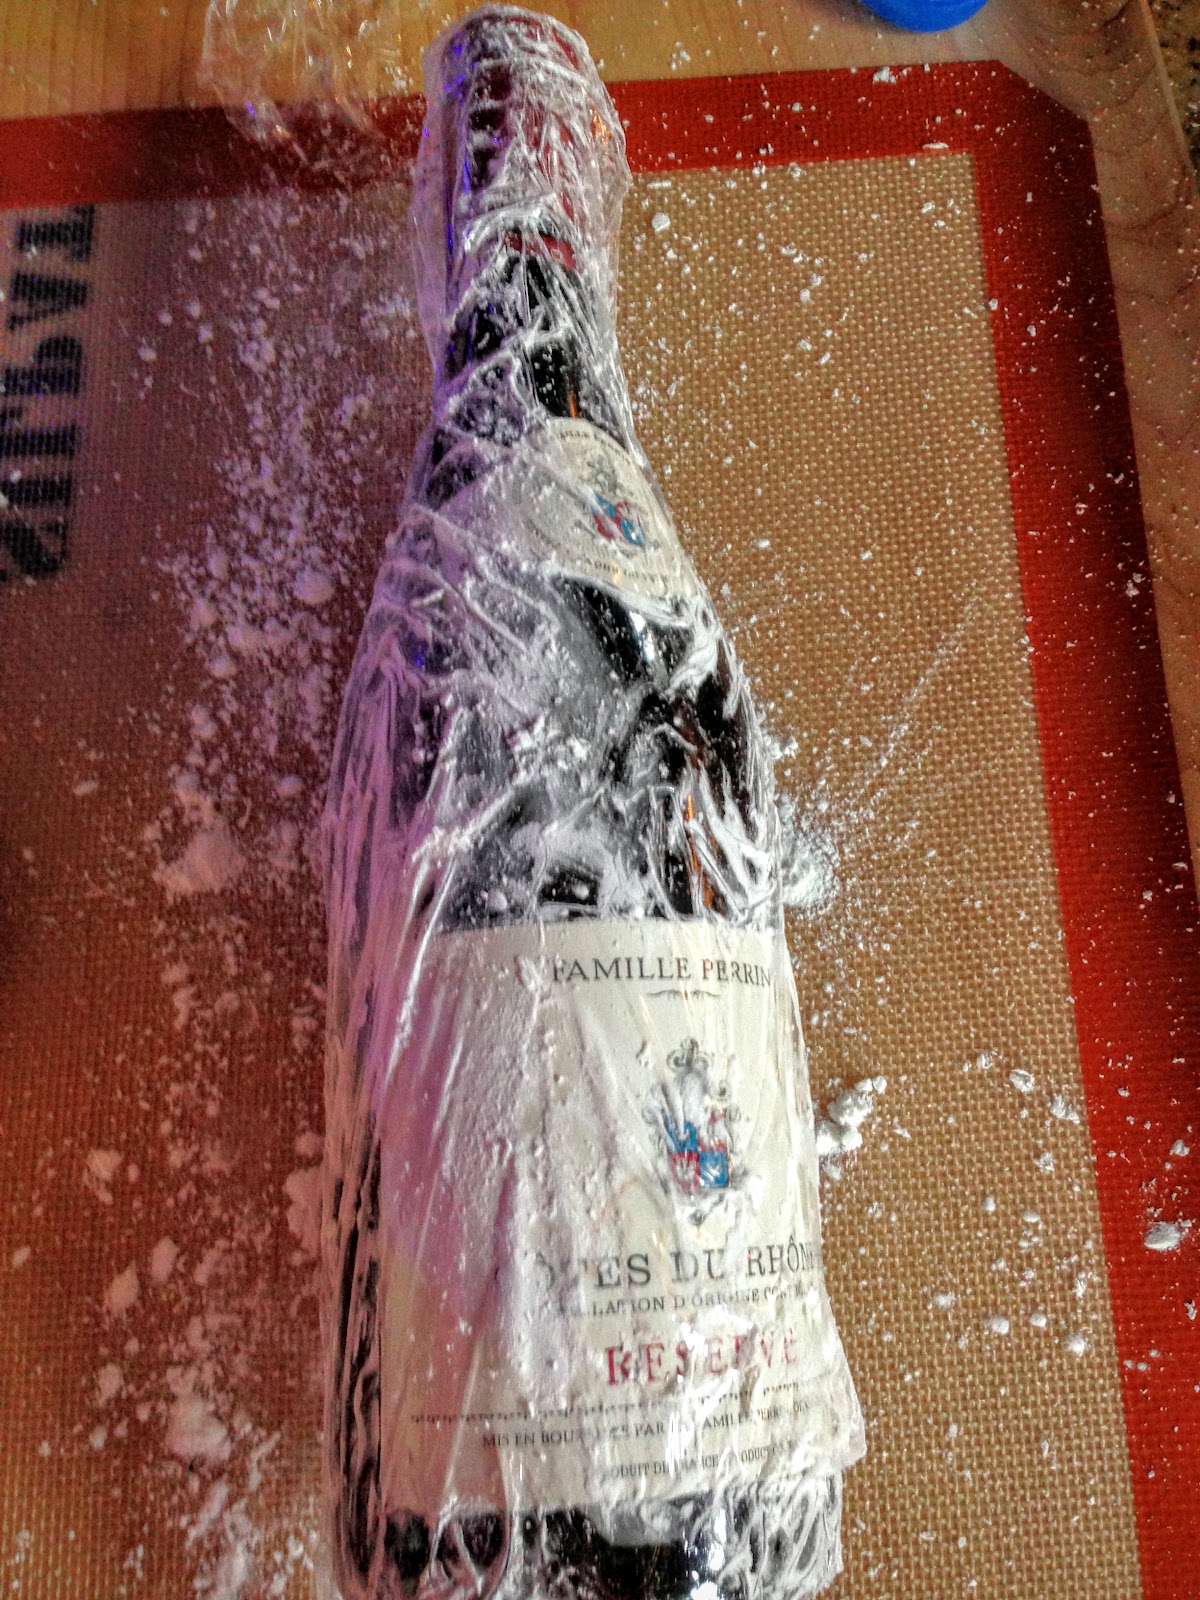
Wrap the bottle in saran wrap and coat with corn starch. Just take a big fistful and smear it all over the bottle; the more the better.

After that, roll a strip of gumpaste large enough to cover the top of the bottle. This particular technique makes half of a bottle. Stabilizing the bottle between two items (like books) or on a textured surface, so that it doesn't roll, smooth the gumpaste over the top half of the bottle.

Cut the edges so that 1/2 or slightly less than half of the bottle is covered.
If you cover more than the top half of the bottle, the opening will not be large enough to remove the gumpaste when dry.

Let the bottle dry for a few days and then gently unmold. Trim any rough edges.
Place a piece of parchment cut to the dimensions of the label on the bottle and spray paint the entire bottle black. Although I used black gumpaste to begin with, this makes the texture and color a lot more even and gets rid of those pesky residual areas of cornstarch.
It's important to cover the area where your label will be so that the black paint doesn't seep through the label later.

Using a maroon fondant or gumpaste (I mixed a red fondant with a little bit of black until I got the color that I wanted,) roll a thin strip to cover the neck of the bottle. This will be the "wax." Smooth over the top of the bottle and trim the edges.
Mix a bit of gold luster dust with a few drops of alcohol to get a thick paste. Paint a thin line across the bottom of the "wax," and in a circle along the top of the bottle to look like the seal.

Now, I took the frosting sheet, which had been set aside in a very safe place (note that I had three copies of the label, in case I messed up. . . I used all three.) The frosting sheet was so delicate; if you so much as breathe on it the wrong way, it tears. Which can be a problem, because I had to apply piping gel on the back to bind it to the bottle, and then smooth the whole thing down without ripping the edges. No easy task, and the reason I ended up using all three labels by the end.
The very last step is to make the "wood" shavings that will cushion the bottle in the crate. What do you think looks exactly like wood shavings? Toasted coconut of course! A couple cups of sweetened coconut toasted for 10-15 minutes in the oven, and you get that perfect brown/white mix of wood shavings.
Finally, tack the gumpaste panels to the side of the cake, center the bottle in the middle, and surround the bottle with the coconut shavings, and voila! The perfect vintage!


Beautiful end result! Is the gumpaste hard, or can you cut through it easily? Thanks!
ReplyDeleteHi! The gumpaste will be hard. You can use fondant or modeling chocolate if you want a little softer feel!
Delete