The Healing Powers of Bread
 Before anything else: I found that the blog isn't allowing comments from Mozilla (not sure if it's all Mozilla browsers or if it's selectively temperamental). I apologize if you've been trying -- I have been looking around but am unsure about how to fix that. Please try to leave comments through another browser if you are having issues with Mozilla. Again, sorry about the inconvenience.
Now, BAKING. Let me start by saying work this week was tough -- absolutely brutal, if I'm being perfectly honest. It's one of those weeks which, by the end, I just want to collapse on the couch, wrap myself in a blanket, and not emerge for the next forty-eight hours. And, I have to admit, there have been weekends which have been spent in that fashion; but I think that I've found a better way to deal with the various and inevitable stressors of life. Ready? Here it is. . .
Bake bread.
Once again, this recipe is from the Bouchon Bakery Cookbook.
(I read a review recently: "Do you bake, want to bake, dream about baked goods and are a Type-A personality, then invest in this book!" -- it made me laugh because I felt like it described me perfectly)
Nanterre
(fancy name for specially shaped brioche)
Equipment
Stand Mixer with Dough Hook Attachment
2 Loaf Pans
(for once, all of these are pretty easy to find
Ingredients
Amazon must have missed my business this week)
Instant Yeast
Unsalted Butter at Room Temperature
Eggs
Sugar
Flour
Milk
Sea Salt
Instructions
This recipe is so calming, in part, because following it is almost mindless. Really -- first, you just add the yeast and milk together and give it a quick mix in the stand mixer. Then the remainder of the ingredients, except the butter, get added in and mixed for just under five minutes. Here comes the best part: Continue mixing for thirty minutes, meanwhile, adding little chunks of butter (I did half inch cubes) one at a time. You must wait for each chunk of butter to get incorporated before adding another one in -- that's why it is so very important that the butter is room temperature (otherwise it takes a whole lot longer to incorporate.) It takes about forty seconds to a minute for each chunk of butter to fully disappear into the dough.
I find it oddly soothing to watch each piece get whipped around, stretched, and finally pulled into the dough.
At the end of the thirty minutes, the dough will be loose and hang off of the hook.

Scrape it off of the hook as well as whatever dough is left on the side of the bowl and bottom of the bowl (which may not be much, if anything.) Mix for another ten minutes.
Pull the dough off of the hook and place on (very lightly) floured surface. Pat into a rectangular shape while pushing air bubbles out to the side and eventually out of the dough.

Then stretch one-third of the dough from the left side outwards and then fold towards the center, followed by the remaining one-third from the right, again stretching outwards, and then folding towards the center (like you would fold a letter)

Do the same stretch and fold, but with the top and bottom of the now vertically long dough. When you are finished, you should have a roughly square packet of dough. Place in the greased bowl with the opening of the dough facing the bottom of the bowl. Let sit for one hour. Repeat the stretching and folding process one more time and place back in the bowl for an overnight chill in the refrigerator.
The next morning, turn the dough out and again pat into a rectangular shape, pushing any remaining air bubbles outwards. Roll the dough into twelve equal balls.
*Don't be sloppy when doing this. If you don't roll the balls smoothly, the creases in the dough end up being large holes in the finished loaf.*
Place 6 balls in each pan, and brush with egg wash. (To make a truly excellent egg wash -- aggressively beat a whole egg and strain it through a fine mesh strainer. You can brush or spray onto dough)
Set aside under a plastic or cardboard box to proof for two-and-a-half to three hours. I try to use cardboard to proof because I feel like it holds the heat
better than plastic -- nothing fancy; I usually use an Amazon shipping
box. Make sure that you put the dough in a WARM area -- recommendations for proofing dough state that the temperature should be around seventy-two to eighty-five degrees Fahrenheit; I put my dough in the warmest place in my home, in front of my fireplace. When appropriately proofed, the balls of dough should expand so that they touch each other. (See the progression from pre-proofing to post-proofing in the pictures below.) They should also be much softer than they were originally. Then, another coating of egg wash and into the oven they go.


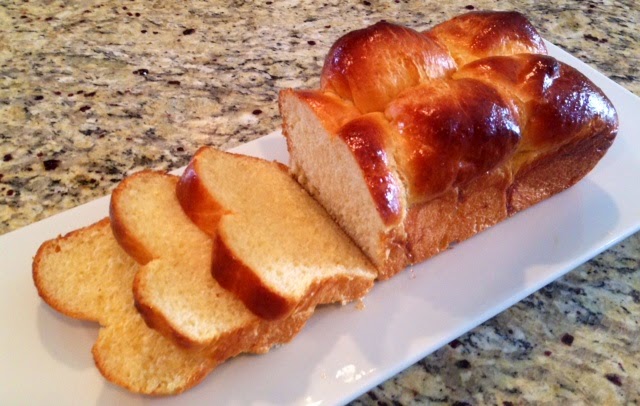
And here is the finished product.
The great part about brioche is that it is so versatile. It's great with just a bit of butter, but my favorite way to use it is to toast up two pieces, slather a side of one with mayonnaise, a side of the other with mustard, line with lettuce, and stuff with Genoa salami, provolone, and hot sopressata. Little bit of France, little bit of Italy, lots of mayo. . .delicious. The bread can also be sliced into cubes, drizzled with some olive oil, sprinkled with salt and pepper, and popped back in the oven to make homemade croutons. Also very yummy.
Tips:
- Probably because of the high butter content, it is very easy to burn brioche, both when re-baking, or when toasting -- so make sure to keep a close eye on that precious bread!
- If you aren't as much of a carb monster as I am, you can also freeze the brioche, double wrapped in plastic, for at least a month (and probably two). I find that it's easier to slice and freeze the slices individually -- then just pop out of the freezer a couple hours in advance and unwrap when you are ready to use the bread. It toasts up perfectly even after being frozen.
- Slice the pieces thick -- because this is a delicate bread, it needs a bit of heft to get a satisfying bite when eaten plain, as well as for it to hold up well in sandwiches.
Make this recipe -- it is not difficult and the rewards are great, for the stomach and the spirit! Try it out and tell me what you think!


Comments
Post a Comment