Rosy Posy Birthday Cake
 I love birthdays. Especially my birthday. Some people think it's odd that I still get excited about my birthday since I'm in my mid-30's; in fact some people think (and have actually told me) that once you reach your teenage years, it's unseemly to look forward to your birthday. ?! (Note: Although I try to be a tolerant person, these aformentioned people are not among those I would call friends. . .some ideological differences are too great to look beyond.) But I do love my birthday. And what's the best part of a birthday. . .BIRTHDAY CAKE (of course)! And I just happen to have to good luck to bake. (Does anyone see where this is going?) I'll just come out and say it: For my birthday, I baked myself a birthday cake. A significantly greater number of people than the group mentioned above thought that this was odd. But no! It makes perfect sense! I love my birthday; I love birthday cake; I happen to be quite picky (although I prefer to think of it as having very high standards); and I love to bake. Hence, I should make my own birthday cake. And I did. And it wasn't bad, if I must say so myself, although it took a long time. One of the disadvantages of baking as a hobby is that it has to be scheduled around all of the other time-consuming necessities of life, so I snatched an hour here, 30 minutes there, multi-tasked my head off, and 3 days later. . . had my birthday cake. Time-consuming, but very satisfying. . . and, honestly, where else was I going to find a rosy-posy triple tiered white cake filled with luscious white chocolate ganache and juicy raspberry preserves and topped with the most delicious creamy, nutty pistachio buttercream?
Like I said, I'm picky. . .
White Chocolate Ganache
Super simple.
Rules of Engagement:
- Use a 3:1 ratio by weight of white chocolate to heavy cream. (I used 9 oz chocolate: 3 oz cream, but I made too much)
- Use good white chocolate. (I used Callebaut)

- Heat cream until just simmering.
- Pour over white chocolate
- Mix to melt
- Let sit until firm.
White Cake, adapted from King Arthur's Flour
(makes three 6 inch round layers)
Ingredients:
2 3/4 cups Cake Flour
1 2/3 cups Sugar
1 Tablespoon Baking Powder
3/4 teaspoon Salt
3/4 cup (12 tablespoons) Unsalted Butter, almost melting in consistency
4 large Eggs Whites plus 1 whole large Egg at room temperature
1 cup Whole Milk
2 teaspoons Vanilla Extract
1 teaspoon Almond Extract
1 teaspoon Coconut Extract
Process:

Preheat oven to 350 degrees, standard. Grease three 6-in round pans and line with parchment paper. Set aside. Sift the cake flour into a large mixing bowl. Add the sugar, baking powder, and salt. Mix for a couple of minutes at low speed with the paddle attachment until completely blended. Add the butter and blend until the mixture resembles damp sand.
Add the egg whites, one at a time, for one minute per egg white, scraping down the sides of the bowl and the bottom of the bowl between each egg. Add the full egg last.
In a small bowl, mix the extracts with the milk and add slowly, in thirds, while still beating to the mixing bowl, being careful not to splash. Between each third of milk, beat mixture for one minute.
Pour into the three prepared dishes; weigh each dish to make sure that an equal amount of batter is in each, ensuring equal sized tiers.

Bake for 45 minutes, rotating the pans halfway through. The cakes should rise significantly; check with a wooden skewer in a couple of places within each cake to ensure evenly and fully cooked cake.

Meanwhile. . .
Pistachio Italian Buttercream, adapted from King Arthur's Flour
(makes enough to frost and decorate a 3 tiered 6 in layer cake, with enough extra to practice making buttercream roses. . . or to eat straight out of the bowl ;) )
Ode to Buttercream:
oh buttercream. . .
whatever form you may take
whether swiss, italian, or french
each separate
yet together in inspiring despair, in the very recesses of my soul
i cry, i scream, i wish to tear my hair out
to throw offending bowl through the window,
the shatter of glass mimicking my tortured heart
but in the end, you are the best of the best.
no other can compare.
the depths of my hatred for you are only exceeded by my love
it is a thin line indeed. . .
Take a moment to appreciate my bad poetry. . .
But really, buttercream is the worst (and the best!); every time I make it, something different happens. It's so moody. Last time I made this buttercream, it turned out beautifully. So easy and delicious, and. . . this time? No. Not so much. But I digress.
Ingredients:
Sugar Syrup:
1 1/4 cup Water
1/2 cup Sugar
Meringue:
8 Egg Whites at room temperature
1 tsp Cream of Tartar
1/4 tsp Salt
1/3 cup Sugar
1 cup Water
Frosting:
6 sticks Unsalted Butter in 1 in cubes
1/4 cup Hi-Ratio Shortening
1 1/2 Tbsp Vanilla Extract
1/4 cup +2 Tbsp Pistachio Paste
Process:
Combine sugar and water for sugar syrup in small saucepan. Stir briefly to dissolve sugar, then heat to 240 degrees Fahrenheit.
Combine all of the ingredients for the meringue, except the sugar, and beat with a whisk at medium to medium-high. The mixture will get foamy and then opaque and white. Sprinkle in the sugar and increase the speed to high. Whip until stiff peaks form.


While the stiff peaks are forming, make sure you keep an eye on the sugar syrup. After the mixture reaches 240 degrees, but before it reaches 250 degrees, take the pot off of the heat and slowly pour into the stiff meringue mixture, along the side of the bowl, so the sugar syrup does not get caught in the whisk and start to spin sugar strands.
Whip at high speed for approximately 20 minutes at which time the mixture should be no warmer than 80 degrees Fahrenheit; then add the butter. This is very important. Do not add the butter until the mixture has cooled to the specified temperature -- otherwise you will get buttercream soup. It helps to wrap an ice pack around the base of the bowl.
Buttercream is very finicky. If the mixture is too hot, like I mentioned above, when you add the butter, it will melt -- leaving you with an oily, soupy mess. If it's too cold, the meringue and the butter will not combine and you will have a chunky, nauseous disaster. Both of these things happened to me within the same batch of buttercream. Sigh. . . see ode to buttercream, above.
The mixture was was running around 89 degrees F, but I had already been whipping for so long, that I just gave up and added the butter -- which then promptly melted into the oily mess referenced above.
There are (theoretically) ways to fix this. One involves placing the bowl into an ice bath and mixing until the buttercream forms properly. Want to see what happened when I did that?
This Happened:
So gross. At this time, I was unhappy. Really, really unhappy, and wondering how much it would cost to buy buttercream straight from a bakery. But I persevered.

The disgusting mess above happens when your mixture is too cold. Which is actually not as hard to fix as a too hot buttercream. Ready? Here's the secret: Take (for this amount of buttercream) a full water glass of the congealed/watery butter/meringue mixture and heat in the microwave until melted. Pour a glass of wine. Add the melted mixture to the bowl. Take a generous swig of wine. Beat the mixture at high speed. Practice breathing until it happens. What happens, you ask?
This Happens:
And that, my friends, is buttercream. (Italian in this case, but they all work pretty much this way.) Add 1/4 cup pistachio paste and the vanilla extract to taste, and take a deep breath. The hard part is done.

(At sometime during this debacle, the cakes should have finished baking. Set them on a rack to cool. )Because I'm a sucker for layers, I torted the each layer once cooled (fancy way of saying 'slice in half.') A bread knife works beautifully for this. If the tops of the cakes have domed, slice them down until flat. Fill a pastry bag without a tip with a small amount (1/4 cup) of white chocolate ganache. Cut a small hole at the tip of the bag. Heat 1/4 cup of raspberry preserves in the microwave for 20 seconds. The preserves should be loose enough to easily spread, but not so loose that they are liquid. If you overheated, no worries. Just wait a couple of minutes and they will firm right up again.

Now, the fun part. Place the first cake half, cut side up on a 6 in cake board. Pipe a ring of white chocolate ganache around the cake, leaving just a little space between the edge of the ring and the edge of the cake. Spread 1/3 of the preserves inside the ring. The ring of ganache will prevent the preserves from seeping into your frosting on the outside of the cake. Place the other half of the first cake, cut side down on the first half. Press down gently to even the top, but not too much (!!) or else the preserves will leak out the edges. Spread 1/4 cup white chocolate ganache evenly on the surface.

Repeat with the remaining 4 layers; however, once you have placed the very top layer on top of the stack, do not top with ganache or preserves.
Instead, spread a very thin layer of buttercream over the entire cake, just to cover the surface and give you a even decorating surface.
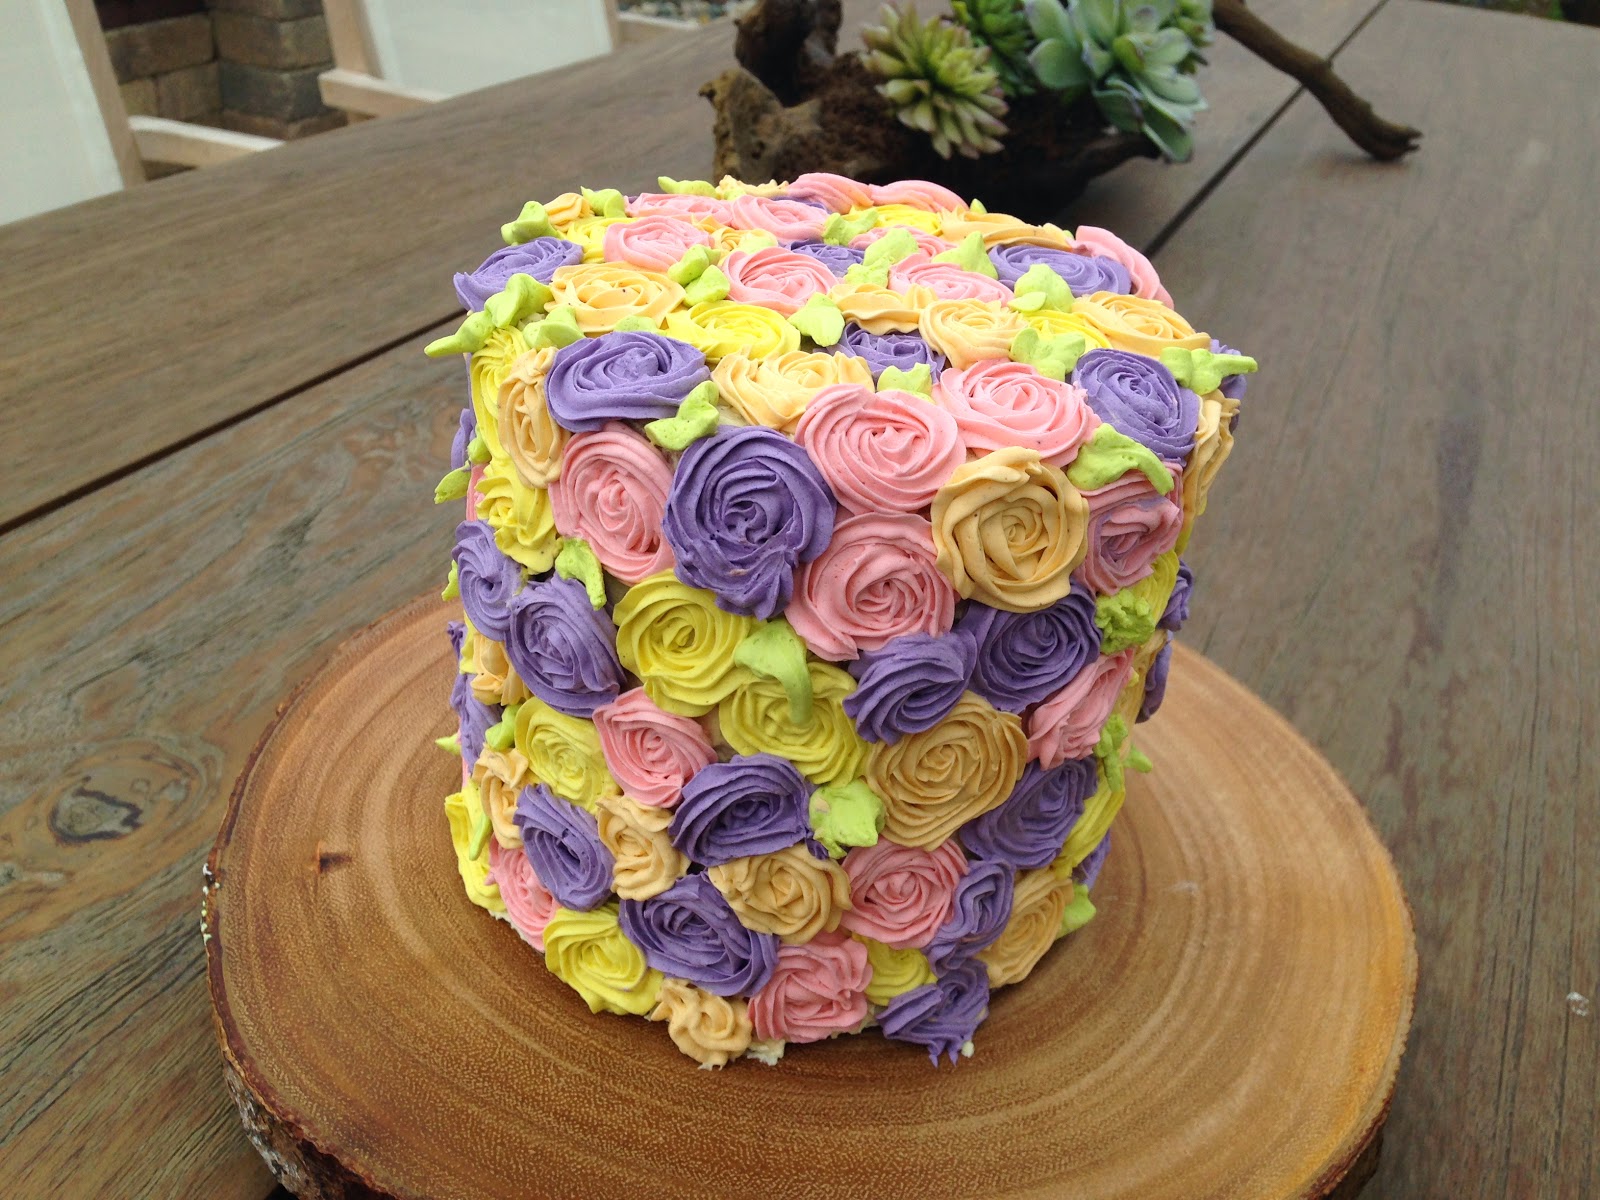
Then, decide how many colors you want to decorate with. I happened to see a cake with orange, yellow, pink, and purple that looked particularly good (and unexpected -- who would think that orange and purple would go together??), so I decided to use 5 colors (including green for the leaves.) I pulled out 5 bowls of approximately equal size and divided the frosting. Then using gel food coloring (because liquid will cause the frosting to break, and after all the work that frosting took. . . well. . . perish the thought), mix up your colored frosting. Go slow, because a small amount of gel coloring goes a long way, especially if you use Electric colors by Americolor. Prepare 5 pastry bags either with individual tips or couplers if you are planning on using the same tip (which is cheaper but so much more of a pain.) Use a closed star tip for the roses and a leaf tip (duh) for the leaves. The most common closed star tip is the Wilton 2D, but I wanted a smaller rose, so I went with an Ateco 26.
Technique:
(So easy I almost don't want to give it away)
With your tip at a 90 degree angle to the top of the cake, pipe a small mound straight up, then move the tip in a circle (either clockwise or counterclockwise works.) Make sure you keep the circle tightest at the center and then gradually looser as your "rose" expands. This is almost foolproof. The only way to mess it up is if you make your circle too loose and the layers don't hug each other. Then it does look kind of silly -- but this is pretty much the easiest piping technique out there. (And millions of times easier than making real piped buttercream roses. The top is the easiest to do -- the sides are slightly trickier, but as long as you keep the circles tight, you will have no problem. (Get the theme here? Keep the circles tight.) The warmer the buttercream gets, the messier the roses will look, so refrigerate the bags as needed to keep cool.
I interspersed the roses randomly and filled in gaps with leaves, but my husband suggested that it would have been easier if I had a pattern in mind. He was correct (and, more importantly, had the right to gripe since I recruited him to make the process go more quickly.) But I did like the randomness.
The leaves are slightly more tricky. I'm still honestly not sure how to do it -- I just kind of kept experimenting until I had a few that turned out ok. My technique (which probably is not actually the right technique) was to hold the long end of the tip more parallel to the cake than perpendicular, squeeze while keeping the tip in place, and then after getting a small amount of frosting built up, quickly pull the tip outwards while relaxing pressure on the bag. The leaves were not the prettiest part of my cake (my husband said that they looked like lizards), so maybe don't use my technique. . .
The overall product turned out pretty well though --
I'm not ashamed to say that I'm pretty proud of my creation. . .
(props for the cake banner do go solely to the husband, though)
(props for the cake banner do go solely to the husband, though)


Comments
Post a Comment