Strawberries and Cream (Cheese)
 Is everyone ready for Christmas?! I almost thought I wouldn't make it; but right there at the end, my husband and I managed to pull out all the stops, and get the shopping done, gifts wrapped, tree up, and goodies baked. Whew! Just in the nick of time.
For those of you who thought you got everything done, and then, just at the eleventh hour, realized that you're heading to a friend/family member/colleagues' place and you have nothing to bring, it's ok. Don't panic, and for the love of God, put down that dusty bottle of wine. Here's an elegant treat that you can whip up at the last moment. (Actually, the later you wait, the fresher it tastes.)
Strawberry Cheesecake Bites (modified from Pinterest, my new love)
Fair Warning: This is the lazy method (or panic-d method) of making this recipe. You could make the cheesecake filling yourself. . . but why? Just buy the tub from the grocery store and save yourself some time.
Ingredients:
4 Packs of strawberries (the larger the berry the better)
 |
| Beautiful Berries |
4 oz White candy disks
4 oz Semisweet chocolate
Sugar pearls
Equipment:
Snowflake Template from Tickle the Imagination
Fancy pastry tip (1M works best, but I hadn't run the dishwasher, so I ended up with a french tip instead)
Parchment paper
Melon baller (or a small spoon works fine, just with slightly more effort)
Procedure:
Prep a cookie sheet with parchment paper
 |
| Cored and Ready! |
Cut the leaf part off of the strawberries, and core them, inserting the melon baller at the widest part.
Cut a small portion of
the tips off so they stand up straight on their own.
Heat the semisweet chocolate gently over a double boiler until fully melted and glossy. Be careful not to overheat, or else the chocolate will look lumpy and charred.
 |
| Tacked to the Parchment |
Let the chocolate solidify for at least 15 minutes. The longer the better. If you have enough time, wait an hour.
Meanwhile--
Fit a large pastry bag with a fancy tip -- some sort of star tip is best. Fill with the cheesecake filling. Store in the fridge.
Lay the snowflake template on a cookie sheet.

Cover with parchment paper and tape down. Fill a pastry bag with the candy disks. Microwave on 50% at 30 second intervals until the chocolate is fully melted but not burned. In other words, the moment the chocolate is melted, remove it from the microwave. Twist the top shut so chocolate won't come out the wrong end. The bag will be very hot, so wrap it in either a paper or kitchen towel to be able to properly handle it. Cut a tiny hole in the bottom of the bag and test on a plate or scrap paper to make sure that you can pipe a smooth steady line of chocolate. If not, cut the hole slightly larger. Make sure you don't cut the hole too big, otherwise it will be impossible to control the line of chocolate. It's all about moderation, people.
Pipe over the outline of each snowflake. If you are anything like me, your snowflake may look a little messy, but that's ok, just tell people that it's in the process of melting ;)
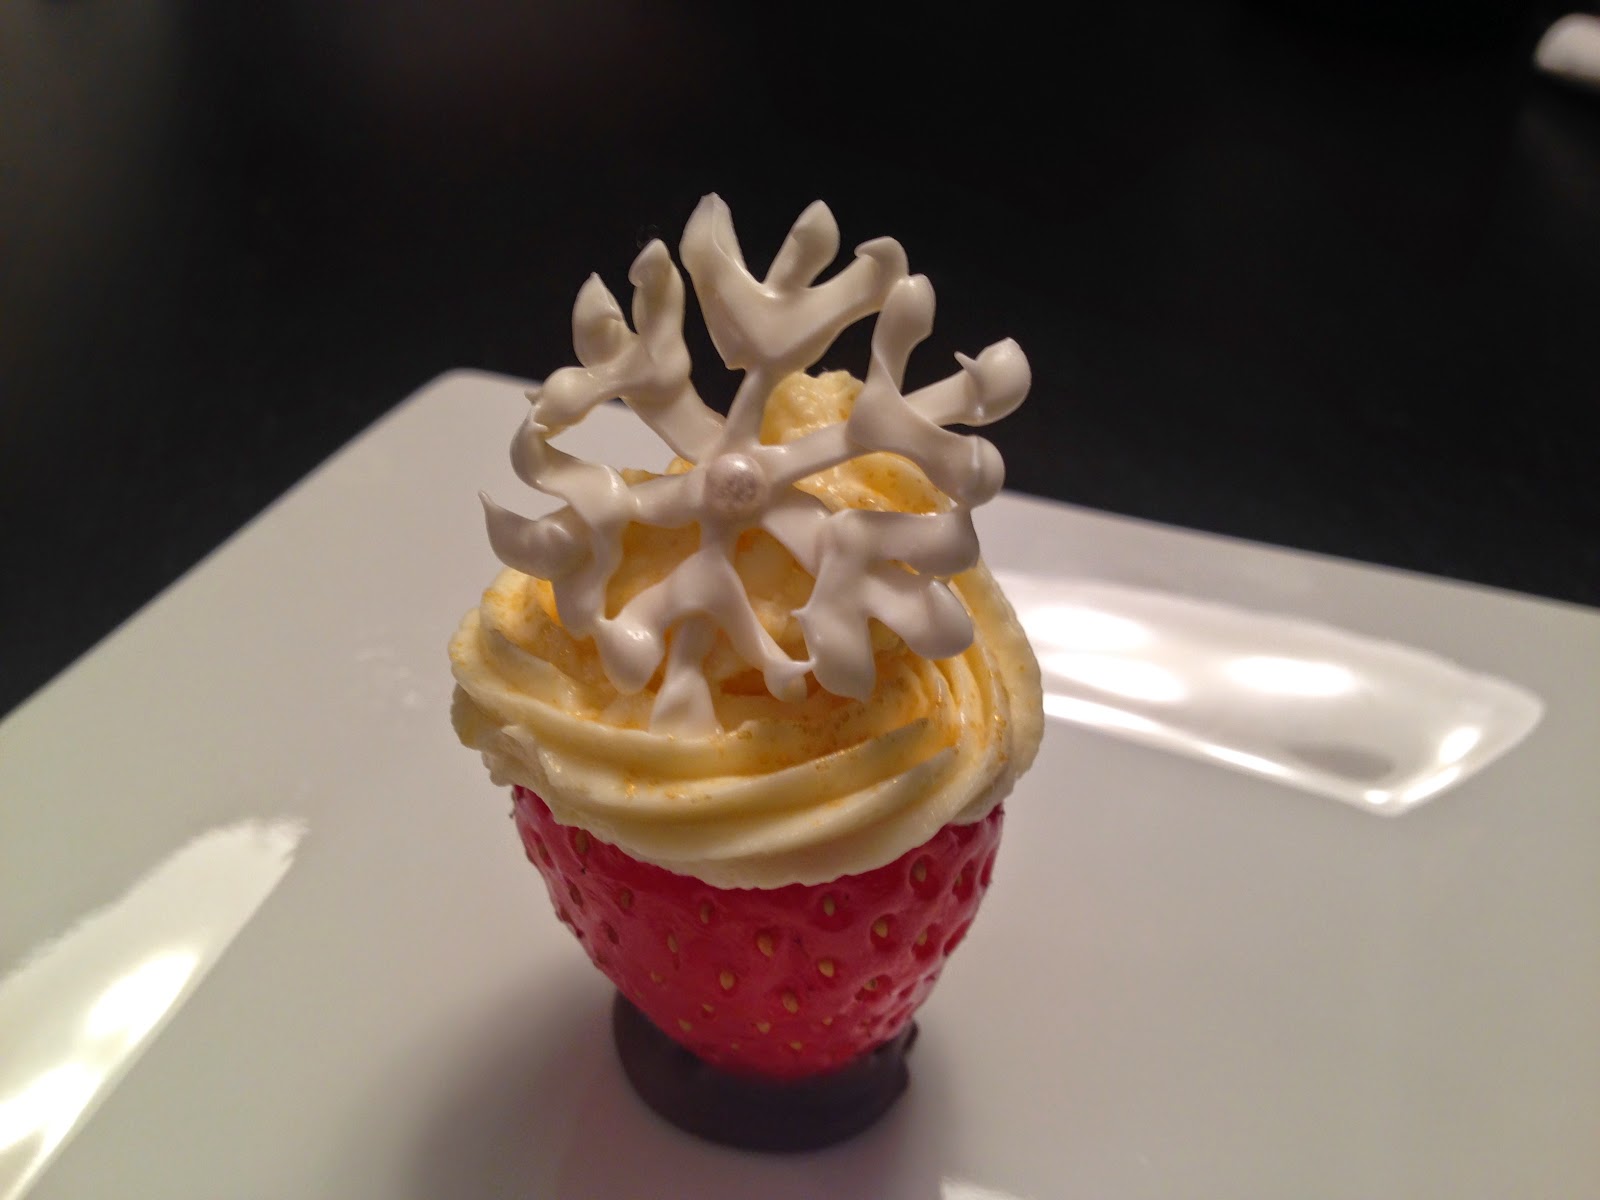
Press a sugar bead into the middle of each snowflake. This is easiest with a pair of (cooking) tweezers. Otherwise, if using your fingers, be very careful.
Let the chocolate harden completely. This won't take long because the lines are so thin, but I waited about 15 minutes just to be sure. Peel very carefully from the parchment.
 |
| So pretty! |
 | ||||||||
| My chivalrous husband |
Ok, back to the strawberries. Pipe a mound of filling into each berry. I found that this works best if you first pipe a ring on the border of the strawberry, then pipe straight down until the cavity fills, and then finally pipe up into a pyramid, starting from the border and working in. If you use the same filling that I did, beware, it is very, very firm. I almost gave myself a stress fracture trying to squeeze it out of the bag. Eventually, my husband took over.
Place a snowflake on top of each strawberry. Be very careful; if you exert too much pressure, the snowflake will break. Sprinkle with some edible glitter.

Carefully move each strawberry to your serving plate to display as you wish. Some of the chocolate may not transfer completely (I think this may be a consequence of contact with the relatively moist strawberries.) If the chocolate is still moist, press down slightly when placing on the serving tray to suction the berry onto the tray. Store in the fridge. Surprisingly, these transport remarkably well, so they are a great gift


Comments
Post a Comment