The Lovely Limes

It's officially the dog-days of summer. 80's, 90's, higher even? It doesn't matter -- when it gets that hot, it's just simply hot. The kind of hot where the only realistic plans seem to involve air conditioned rooms, frothy chilled drinks and high-spinning fans. Of course, we still have to eat (and I still have to eat sweets.) So the obvious solution is to take the icy cold dreams from a hot summer day and spin them into the perfect chilly dessert. For inspiration, I looked to Joe's Stone Crabs for their very famous, very delicious key lime pie, from the ultimate hot, hot, hot location itself -- Miami. I have to say, they found the perfect way to quell the heat. One slice of this half frozen, tarty concoction and you can almost feel the cool ocean breeze on your face. Here it is, (with a few alterations, to make it Cup-of-Sugar unique.)
Key Lime Pie
This is the recipe from Joe's Stone Crabs in Miami, with a few slight tweaks
Ingredients
- 10 oz Sweetened Condensed Milk
- 1 lime Lime Zest
- 3 Egg Yolks
- 2/3 cup Key Lime Juice
- 2 1/4 cups Heavy Whipping Cream
- 2 tsp Coconut Extract
- 1/2 cup + 6 Tbsp Sugar
- 10 oz Vanilla Wafers, crushed finely
- 10 Tbsp Butter, melted
Instructions
1. Preheat oven to 350 degrees2. Combine vanilla wafers, 1/2 cup sugar, and melted butter in a bowl by hand until the consistency of wet sand3. Press into 9 in pie pan4. Bake for 10 minutes until golden and set; set aside on wire rack when done5. Beat egg yolks and lime zest at high speed using a whisk attachment for 5 minutes. The mixture will increase greatly in size.6. Add condensed milk and beat for another 4 minutes7. Drizzle in the key lime juice while continuing to beat on low, just until fully combined8. Pour mixture into prepared crust and bake for 10 minutes9. Cool on wire rack and then chill overnight10. The next day, beat whipping cream, remaining sugar and coconut extract to stiff peaks11. Divide whipped cream into 4 bowls. Mix each with a desired food coloring (gel)12. Decorate as indicated below and chill again. 20 minutes before serving, throw in freezer for an extra chilly treat.
Details
Prep time: Cook time: Total time: Yield: One 9" pieOf course, my favorite part of the process (other than eating) is always the decorating. My husband, bless his heart, suggested that I put a piece of spiralized lime peel in the middle of the pie. To which, I just gave him a look. We eat first with our eyes! It must be beautiful, perhaps not above all, but importantly.
This pie is in honor of those gorgeous summer flowers which, as opposed to we humans, who seem to wilt in the heat, defiantly bloom fuller and more breath-takingly with every additional degree of mercury.
Since I am no artist, I was especially excited to learn of these new Russian piping tips, which make piping flowers by hand painless. Using really simple techniques, it's relatively easy to produce multi-toned flowers, that look like they took ages to perfect. Here is the step-by step:

After you have colored the whip cream as desired, roll out a piece of saran wrap on your kitchen counter. Draw a few lines of color on the saran wrap, using a toothpick dipped in gel color.

Spread a thin rectangle of one color of whipped cream on top of the lines, with a thinner rectangle (more like a line) in the center of the first color.
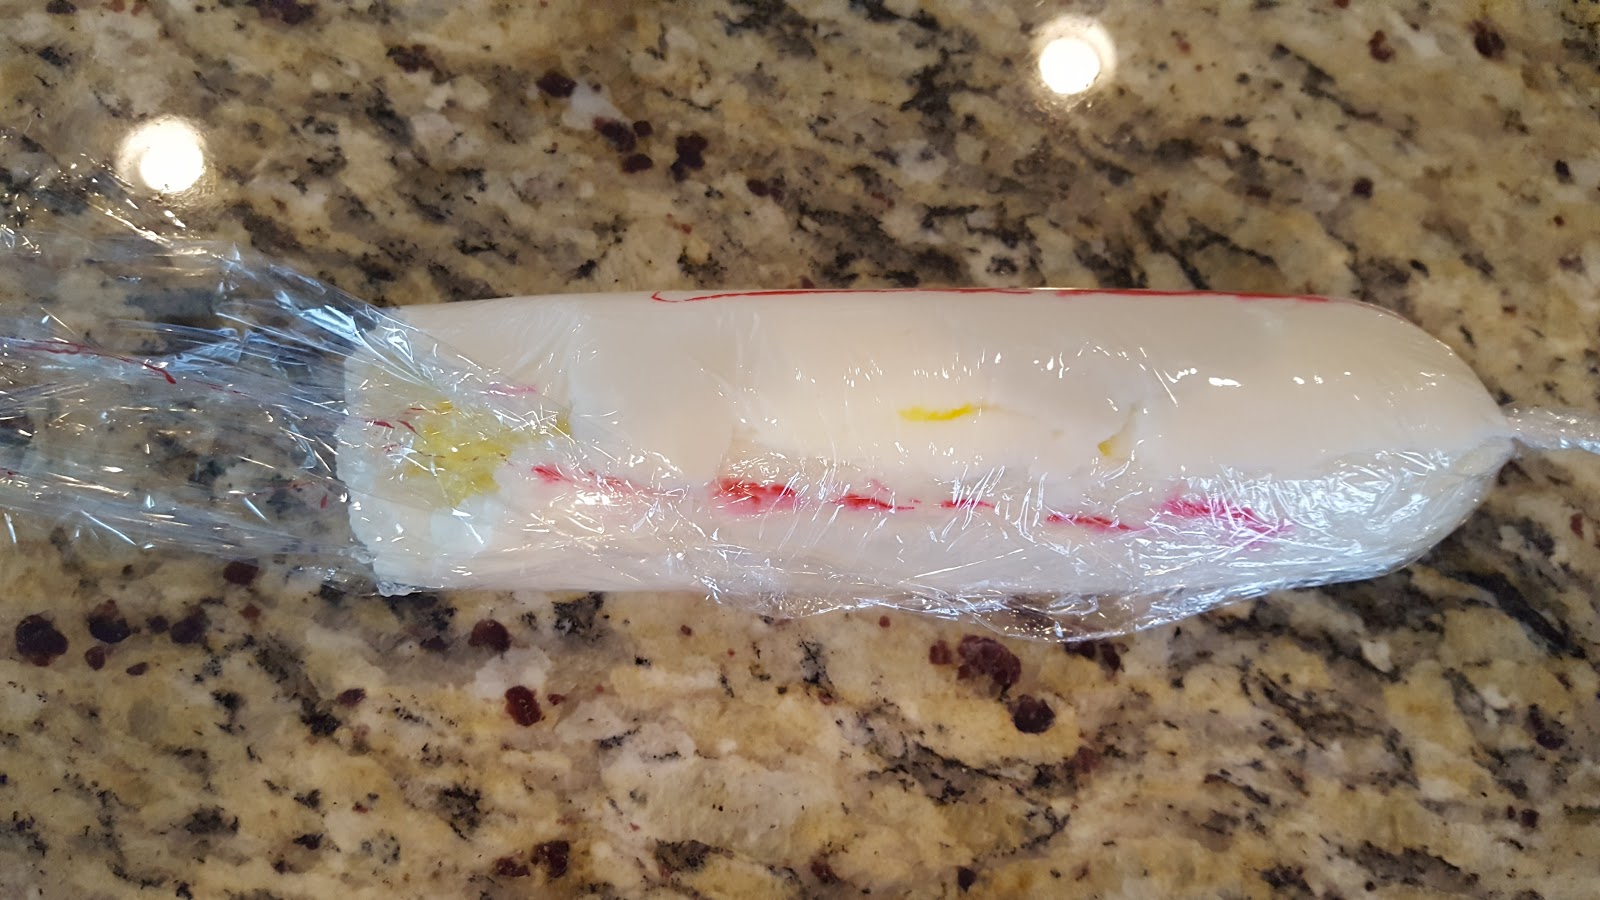
Bring both long edges of the larger square up to meet, effectively sandwiching the secondary color in the middle. Twist both ends of saran wrap tightly.
Finally, cut one end of the wrap off, so that the icing can come out and drop that side face down into a piping bag fitted with a Russian tip.
Now, for those of you who have some decorating experience, these flowers are piped just like drop flowers. For those of you who have no idea what that means -- it means this: place the tip just barely above the top of the pie. Start squeezing, and when the icing that starts to accumulate on the pie meets the tip, pull straight up. If you continue squeezing the icing while you pull up, you will get a longer flower (although definitely stop squeezing before the end of your pull, or else you'll get a really droopy flower.) If you stop squeezing and then pull up, you'll get a shorter flower. Either way, it makes for a really pretty, really easy, really fast, bouquet of posies. I did this with two different tips, and two combinations of food coloring (white with pink stripes and yellow centers , and pink with yellow centers.) Fill in the gaps using a leaf tip with green whipped cream. And finally, if you used a removable bottom tart pan, this is the time to remove the side and plate.
And voila . . .

You see, eat first with your eyes! (And then, as always, with heart!)


Comments
Post a Comment